

Getting Started with Ruby: A Beginner's Guide to Installation and Basic Programs
Introduction to Ruby, setting up the environment, and writing simple Ruby programs


Welcome to my ruby course. After a long time, I decided to teach Ruby here on my blog! I divided the course between weekly chapters. At the end of each chapter, I will let the last and next one link (if they exist at the moment).
Just to mention that I’m not a Ruby guru (not yet 🤔) I’m just a dev trying to help the community the way I know so, Experienced Ruby Devs reading these articles, if you find something that needs a fix or complementation, let comment bellow or DM me on Linkedin/Twitter. Hope you enjoy it! Let's go!
Ruby overview
First of all, Ruby is not Ruby on Rails. Ruby is a whole language and Rails is a famous Framework built on top of that. Here in this course, we are gonna learn the Ruby Language.
Another thing you need to learn to know about ruby is that it is very very object-oriented. Everything in ruby is an object. You don’t know what an is object? Don’t worry. I’m gonna explain to you further. All you need to know now is that.
Last but not least, if you have programmed in other languages before you’re gonna see that ruby is a very fun language to program. That is at most because Ruby has an elegant syntax designed to be intuitive and readable by humans. Its design philosophy emphasizes simplicity and productivity, which means you can accomplish more with fewer lines of code compared to many other languages.
Now that you’re contextualized about Ruby, let's jump into the Ruby Dev Env setup!
Setting up the Ruby dev environment
To set up the Ruby development environment in your machine we’re gonna use asdf, my favorite tool to manage programming languages. Instead of using each language version manager (rbenv for Ruby, nvm for node.js, etc) the ASDF tool enables you to manage all (or almost all) language versions using only one tool. To set your ruby env using asdf do the following:
1. Installasdf
First, you'll need to install asdf. The method varies depending on your operating system.
For macOS:
You can use Homebrew by running:
brew install asdf
After installation, add asdf to your shell by adding the following lines to your .bashrc, .zshrc, or equivalent configuration file:
. $(brew --prefix asdf)/asdf.sh
For Ubuntu/Linux:
First, clone the asdf repository from GitHub and check out the latest version:
git clone <https://github.com/asdf-vm/asdf.git> ~/.asdf --branch v0.10.0
Then, add the following lines to your .bashrc, .zshrc, or equivalent configuration file to initialize asdf with your shell:
. $HOME/.asdf/asdf.sh
. $HOME/.asdf/completions/asdf.bash
After adding the lines, either restart your terminal or source your profile file (e.g., source ~/.bashrc).
Install Dependencies: Depending on your system and the Ruby version you're installing, you might need to install some dependencies. For example, on Ubuntu, you might need to install build-essentials and other libraries:
sudo apt-get update
sudo apt-get install autoconf bison build-essential libssl-dev libyaml-dev libreadline6-dev zlib1g-dev libncurses5-dev libffi-dev libgdbm6 libgdbm-dev libdb-dev
2. Install the Ruby Plugin
With asdf installed, you can now add the Ruby plugin:
asdf plugin add ruby
3. Install Ruby
To install Ruby, first, list all the available versions with:
asdf list-all ruby
Choose a version to install (for example, 3.0.2), and then install it by running:
asdf install ruby 3.0.2
4. Set a Global Ruby Version
After the installation, you can set a global Ruby version with:
asdf global ruby 3.0.2
This sets the Ruby version for all your projects. You can also set a Ruby version on a per-project basis by using asdf local ruby 3.0.2 the project directory.
5. Verify Installation
Finally, verify that the correct version of Ruby is installed by running:
ruby -v
And verify asdf is correctly managing the Ruby version:
asdf current ruby
Your first program in Ruby
Know that you’re with your ruby dev env set, let's play a little bit. Let's create your first code in ruby: The classic Hello Word for sure.
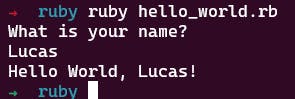
Open your terminal and create a file named hello_world.rb
touch hello_world.rb
Now, open this file in your favorite code editor (mine is vscode) and edit it like this:
puts "What is your name?"
name = gets.chomp

puts "Hello World, #{name}!"
Now run the code in your terminal
ruby hello_world.rb
The code will ask you for your name and right after will respond to you with “Hello World, <Your name>!”
Explaining the code
line 1: puts "What is your name?”
Print the "What is your name?” on the screen
line 2: name = gets.chomp
Make the terminal wait for your answer and when you press Enter, it gets what you typed (gets), removes any trailing newline (.chomp) and saves it into the computer memory for use later (name =)
line 4: puts "Hello World, #{name}!”
Use the value saved in memory to print the "Hello World, <Your name>!” on the screen
It is just a little bit of the power of the Ruby. If you don’t understand all I said don’t whory, more details are coming in the next chapter. Here is just for you to play a little bit with the language and test the environment you set.
IRB
Before we finish this chapter you must know about the IRB existence. It’s a very helpful tool for beginner and even advanced ruby programmers.
IRB stands for Interactive Ruby, it is a tool that came in the ruby package and enables you to execute ruby code, as its name says, in an interactive way. You enter a line of ruby code, ruby interprets it, and returns the response right after.
To test irb you can do the following:
Open your terminal and type irb
irb
It will open the ruby in interactive mode. Now you can ask for Ruby to print some hello world messages for you for example:
puts "Hello world from IRB!"
Ruby will interpret your command and return the message Hello world from IRB! right next.
That is it. Know you have learned the overview about ruby language, how to set up a dev env in your local machine, how to write your first program in ruby and how to use IRB. Hope you have enjoyed it and see you in the next chapter.